Three new training articles covering Bridge CS4 new Output features have been posted at www.ericwexler.com. To go directly to each article follow the links bellow.
Tuesday, January 20, 2009

Thursday, October 2, 2008
The Improved Count Tool in Photoshop CS4 Extended
Photoshop CS4 Extended Improved Count Tool
By Eric Wexler
The count tool in Photoshop CS4 Extended has been improved since its introduction in CS3. One can create differing sets of counts, turn visibility on and off selectively and most importantly can save the counts with the image. These changes give the user doing manual counting more power and the ability to track multiple sets in a single image. In addition options for the size of both the marker and text can be controlled within a permissible range.
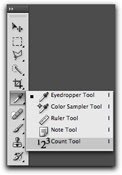
The count tool is located with the eyedropper tool which has been moved to the top forth of the tools bar. This gives the new 3d tools room at the bottom portion of the tool bar. The count tool is also available under the analysis menu item like it was in CS3 Extended.

The option bar give you access to the count tools new abilities. Instead of the dearth of control that was CS3’s count tool, you have a multitude of controls. From left to right first is the tool preset control but this is of no use because at the time then user is unable to define presets for the count tool. I hope in the future that this is turned on because of the ability to create count tool conditions and apply them on different image sets repeatable and easily.
Next is the running total that displays the sum of all the counts and the current selected count group in parenthesis. The next set of controls gives you control over the counting groups. The pull down selects which group is active and gives the option to rename the groups so you can label it properly. To the right are the four control buttons. The eye turns visibility on and off for the selected group, the folder creates a new count group. The trash can deletes the selected group then the clear button removes all counts of the current group without deleting the group itself.
The last part of the option bar controls the display of the labels. The ability to selects any color from the color picker, an ability to control the size of the count mark from an arbitrary 1 to 10, and the font size of the number from 8 to 72.
With these new features the many more workflows are available to use the count tool. One such workflow I will cover is the count and tracking of three sets of cell types in a photomicrograph. The image is a tissue section from a cancer tumor.
It has been stained using immunohistochemistry. This particular method stains the nuclei of the cells brown if the cell has divided, the blue stained nuclei mark the other cells. The third identifiable cell type displays a mitotic body.
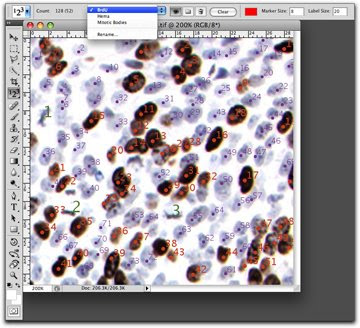
Previously the count tool could only track a single set of items and the workflow would be inefficient. But with the ability to create multiple sets within a single image we can count and label the three types of cells and then save the image with those labels intact.
With the image open select the count tool under the eyedropper/sampling tool. To active the options at least one count label must be conducted. Once a count has occurred the option become active and you can create the count groups needed by clicking on the folder. This gives a dialogue box to name the group. Just repeat to add more label groups. All the groups will be displayed in the pull down menu with the first group that still has the generic name. The active group will have a check on its left when activated. Now use the rename command to change the name of the generic group to something more suitable.
Now with the groups created and labeled we can start counting in the image and select a color and size to increase visibility of the marker. The actual display of the counts are tool based and don’t reside on any particular image layer. The advantage is that the image layer can be modified or replaced without changing the label display. The downside is that there is a minimum of control to the numbers. You can’t create layer styles or do any other layer manipulation that you want to like changing opacity.
To make the most of what you can each label group can have different colors, marker size and font size. This helps discriminate between the sets and make it easier see the results. There are some built in tricks to help label. On a dark background the tool will be white and on a bright background the tool will be black. The mark will be placed on the cross hair position.
Additional counts will be added to whichever count group is active. After all items are counted and labeled the data can be put into the measurement log and the labels can be saved with the image. Only the total sum of all the sets count the count In fact an image can be reopened and counting can continue. Other imaging program won’t see the count tool results but as long as the image is within Photoshop CS4 extended you are ok
An issue with the count tool is that the labels once positioned can’t be moved and fall off the viewable area of the image. If you enlarge the canvas to try to include all visible aspects of the label; the overall position of every count marker moves. To avoid this it is important to enlarge the canvas prior to performing the count. Another thing to be aware of is the labels are included in the histogram so remember to turn of visibility before collecting histogram data.
Additional workflows are possible with the new count tool abilities. The changes make it easier to conduct manual counts and relay o n a single image to multiple sets of items in a single image. Good luck and best wishes in using the count tool to get your work done.
Count tool issues to be aware off
Measurement log doesn't track label group results
Resizing canvas moves position of labels
Count labels are including in histogram data
Can turn on/off layer visibility to leave only the markers visible
Labels visibility would be nice to have on/off all at once
If the file type comes in via Adobe Camera Raw the count labels are lost
This article is based on prerelease version of Photoshop CS4 Extended and things may changed. For other researchers consider the information as a starting point to understand the features and how it may be used. Any workflow or procedure for your own use should be validated prior to data collection.
Eric J.Wexler is a research scientist with a focus on drug discovery. During his twenty-year career in the pharmaceutical industry he developed and validated imaging methods supporting his own research as well as work for other scientists in the fields of cardiovascular disease, oncology, stroke, and medical imaging. He is a member of Adobe’s Biomedical Image Advisory Group. His training Photoshop CS3 Extended for Biomedical Research can be viewed at www.lynda.com.
Any comments or suggestions are welcome.
ericjwexler(Atsymbol)yahoo.com
Tuesday, September 9, 2008
Free Workshop - Pepperell Library, September 18th
Fix ur Pix with Six - Adobe Photoshop Elements 6.0
Come see a live demonstration using Adobe® Photoshop Elements 6.0 to fix examples of common problems in digital images. I will demonstrate workflows that include correcting exposure, color cast, red eye and poor composition. RAW file format pictures will be adjusted using the Adobe Camera Raw module in the low priced consumer version of Photoshop, Elements version 6. If you own a digital camera or work with digital images this is an opportunity you don’t want to miss.
Make your pictures even better than what you remember.
Level – Basic to intermediate
Prerequisites – Know how to use your computer.
When – September 18th, 2008, 7PM
Where – Lawrence Library, Pepperell, MA
Cost – Free
Eric Wexler is the author of the lynda.com titles Photoshop CS3 Extended for Biomedical Research and Photoshop CS3 Extended Research Methods and Workflows. He has written multiple articles for Photoshop User Magazine and has conducted workshops across the country, including Photoshop World 2007 Las Vegas. He is currently on Adobe’s Biomedical Image Advisory Group and is the author of “Optimum strategies for using Adobe Photoshop CS3 Extended in biomedical imaging” found on Adobe’s Medical Professionals webpage.
Come see a live demonstration using Adobe® Photoshop Elements 6.0 to fix examples of common problems in digital images. I will demonstrate workflows that include correcting exposure, color cast, red eye and poor composition. RAW file format pictures will be adjusted using the Adobe Camera Raw module in the low priced consumer version of Photoshop, Elements version 6. If you own a digital camera or work with digital images this is an opportunity you don’t want to miss.
Make your pictures even better than what you remember.
Level – Basic to intermediate
Prerequisites – Know how to use your computer.
When – September 18th, 2008, 7PM
Where – Lawrence Library, Pepperell, MA
Cost – Free
Eric Wexler is the author of the lynda.com titles Photoshop CS3 Extended for Biomedical Research and Photoshop CS3 Extended Research Methods and Workflows. He has written multiple articles for Photoshop User Magazine and has conducted workshops across the country, including Photoshop World 2007 Las Vegas. He is currently on Adobe’s Biomedical Image Advisory Group and is the author of “Optimum strategies for using Adobe Photoshop CS3 Extended in biomedical imaging” found on Adobe’s Medical Professionals webpage.
Friday, August 15, 2008
Optimal Strategies for Using Photoshop in Biomedical Imaging
NEW Optimum strategies for using Adobe Photoshop CS3 Extended in biomedical imaging (PDF, 2.6M)

I have just added to my site the link to the White Paper I wrote for Peachpit and Adobe. It can be downloaded from the Medical Professionals Page or clicking on the link above.
Monday, May 19, 2008
DICOM: A Healthy Image File Format
In January of 2008 I was able to introduce one of Photoshop CS3 Extended's most important features and how to use it. Of course I am talking about Photoshop's new native ability to open and work with DICOM files. With this feature built-in Radiologists and others who work with medical images can apply almost any Photoshop feature to modify the images for presentations, education and communication.

Tuesday, May 13, 2008
Measuring Using More than Just Pixels
A readable copy of my Photoshop User Magazine article has been added to my website ericwexler.com.

This article published October 07, is provided courtesy of Photoshop User Magazine (www.photoshopuser.com).
It covers how to set a calibration standard in the new analysis feature of Photoshop® CS3 Extended. This is useful for gathering quantitative data from images acquired using microscopes, medical imaging equipment , and other devices.
Click here to read the article.
Tuesday, May 6, 2008
Clinical and Research use of Photoshop CS3 Extended
My article "Photoshop CS3 Extended Tools will help save lives" was published in the September Issue of Photoshop User Magazine. This is the first entry in the new column Photoshop CS3 for Research.
I introduce some general uses of Photoshop in microscopy and other research examples including soft agar colony analysis, medial cerebral artery occlusion mode, and DICOM importations.
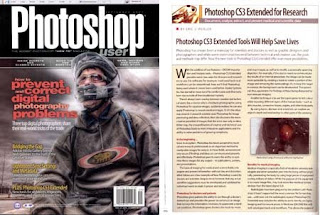
The content is provided courtesy of Photoshop User magazine (www.photoshopuser.com)
To read the article click here.
Friday, May 2, 2008
From Photoshop User magazine - CS3 Analysis Overview
I recently got permission to post my articles published in Photoshop® User Magazine. This is my first article for NAPP found in the special Summer Issue on Photoshop CS3. I hope you enjoy it. It goes over the analysis features added to Photoshop CS3 Extended.
The content is provided courtesy of Photoshop User magazine (www.photoshopuser.com)
Clicking here will take you to a readable version of the article.

Tuesday, February 12, 2008
Available - Photoshop CS3 Extended for Biomedical Research Training DVD
 Now you can have Photoshop CS3 Extended training dedicated to helping biomedical researchers.
After two decades of working in drug discovery this is the training I needed to do my job better. Many years ago I looked for a title that would help me conduct research and apply Photoshop better. Almost none of the training available was developed by fellow researchers. So I created something that helped me and can help you understand imaging basics, learn Photoshop CS3 Extended capabilities, and see actual workflows.
To view this valuable training you can either subscribe to lynda.com. This will give you access not only to my title but titles from well over 100 other authors covering software, graphics, design and a multitude of other subjects. Starting at $25 a month it is a bargain for on demand training. Or you can simply purchase my training DVD.
The direct link to purchase the Photoshop CS3 Extended for Biomedical Research DVD is http://www.lynda.com/store/ProductInfo.aspx?productid=680
Photoshop is software that helps researchers get the most out of their images. Whether using it in conducting research, creating presentations or aiding communication we all can learn to wield this tool better.
I hope I have helped fellow biomedical scientists by creating and sharing this work.
Take care
Eric
Saturday, January 26, 2008
Lynda.com launches my Photoshop title

On January 25th Lynda.com launched my training course, Photoshop CS3 Extended for Biomedical Research. I go into detail how Photoshop CS3 Extended can be used in Biomedical Research. This is based on over fifteen years of drug discovery experience including the creation and managing of a digital darkroom for DuPont Merck and later Dupont Pharmaceuticals.
I cover how to use Photoshop CS3's selection, analysis, and editing tools to evaluate an image's color composition, modify images for research, optimize exposure with levels and curves, transform images with layers, and compensate for acquisition problems and limitations. I also explain how to add reference information to images, annotate and optimize DICOM animations, and share finished images with colleagues. If you are a Lynda.com premium subscriber you have access to exercise files that accompany the tutorials.
I hope that I can help fellow researchers use Photoshop to help them in their studies and demonstrate how it can be a useful tool at their disposal.
Friday, January 11, 2008
The Drobo saved my "life"

Most of us keep a substantial amount of our life on our computers. Current work, personal information, contacts, bookmarks, and the detritus that make up a modern life reside as ones and zeros in a magnetic state in a box nearby.
Now there are only two types of computers in this world. The first group are the computers that are broken and don't work. The second group are the computers that will break and won't work, usually at the worst possible time.
Because this is the way of all things, having a current backup of your hard drive is essential to "life" or at least a good nights sleep.
My Drobo has become a part of good data management. I conduct regular full HD backups using Superduper to backup my entire hard drive once a month (data once a week). With the 1.3 TB of hard drive space (2 x 750GB, 300GB, and 400GB Drives) I can have everything in a one place. When my Macbook Pro went down between Xmas and New Year's I was able to attach my Drobo to my 7 year old G4 install some applications and continue to work.
My G4 is not as stable as my MBP was. It crashes/freezes about every other day but my Drobo has kept my data protected.
My MBP has been at the Apple repair facility since 12/28/07 repairs on hold waiting for a part. Until it get sent back my G4 and Drobo are managing fine if not quickly.
Tuesday, January 1, 2008
My 2007 - A Good Start
As we start the new year it is always good practice to review the last. As I transitioned from Bristol-Myers Squibb Medical Imaging to independent consulting I can share my accomplishments that set the foundation for 2008. Below is the summary of some of my work that I would not have been able to accomplish without the help of many individuals that have given me opportunity and support.
Just to name few are:
Dr. Joseph Bailey for DICOM training, moral support, and a great friendship.
Pamela Pfiffner for the patience, direction and training materials.
Dr. Simon Robinson for honest feedback, supervision and continued support.
Chris Mattia for the help and direction in the taping of my Lynda.com titles.
Folks at Adobe for the chance give input and training to others on the use of Photoshop by Biomedical Professionals
NAPP staff for the support and training as well as the opportunity to conduct training at Photoshop World and in Photoshop User magazine.
My wonderful wife whose support, proofing, and editing of my work has improved the quality of my material and has made it possible to start doing training and consulting.
2007 Accomplishments
1) Member of Adobe’s Biomedical Image Advisory Group
September 2006 - Present
http://wwwimages.adobe.com/www.adobe.com/products/photoshop/photoshopextended/medical/pdfs
2) eSeminar for Adobe – August 14, 2007
Currently available on Adobe’s onDemand webpage – Photoshop CS3 Extended for Scientific_08_14
Photoshop CS3 Extended for Science and Medical Imaging
Tuesday, August 14th, 2007 9:00 A.M. PDT. 12:00 P.M. EDT
In this seminar, we will demonstrate new selection, measurement, and analysis tools that let you quickly extract and export a wide array of quantitative data from microscopic and radiological images, including native support for DICOM images.
3) Adobe Success Story - Seeing inside
Download at http://wwwimages.adobe.com/www.adobe.com/products/photoshop/photoshopextended/science/pdfs/ericwexler_fnl_04242007.pdf
4) Photoshop Testimonial Video
View at
http://www.adobe.com/products/photoshop/photoshopextended/medical/
5) White Paper - Photoshop: The Standard for Physicians and Biomedical Imaging Professionals
Download at
http://wwwimages.adobe.com/www.adobe.com/products/photoshop/photoshopextended/medical/pdfs/ps_biomed_wp.pdf
6) Photoshop World Boston – Birds of a Feather - Use of Photoshop Extended in Science and Medicine, April 4, 2007
Birds of a Feather Meeting – Medical & Scientific Research Professionals April 4, 5:00 – 7:00 pm Hosted by Adobe – Open to Conference Attendees and Medical Professionals and Research Professionals Attend this session to see the newest features in Photoshop CS3 and Photoshop CS3 Extended developed specifically for customers who use Photoshop for image analysis, visualization and communication. You'll get to meet the team from Adobe that is charged with developing new features for the medical and research communities and hear from some leading customers in the field and how they use Photoshop in their work. Attendees will be eligible to win Photoshop CS3 plus other great prizes. Special Guests: Stephen R. Snow, DDS - with Snow Dental Care & Cosmetic Dentistry; Eric Wexler, MBA - Research Scientist with Bristol-Myers Squibb Medical Imaging; Joseph M. Bailey, MD - Montgomery Radiology Associates; and Robert Hurt – Visualization Scientist – Spitzer Science Center.
Track: Special Event — Room: 207 in the Convention Center
7) Photoshop World Las Vegas Workshop –
a)Contributed Workbook Chapter - Using Photoshop Extended in Science & Research
b)Conducted Workshop -Using Photoshop Extended in Science & Research
with Eric Wexler 10:45a-11:45a September 6, 2007
Eric will demonstrate the uses of Photoshop Extended in the areas of Biology/Microscopy. He will get into the details on measurement, image analysis, as well as image correction/enhancement for presentations and publications. Additionally, Eric will go over the do's and don'ts of image manipulation for medicine: Instructor: Eric Wexler Track: Photoshop® CS3 Extended - Special Interest Track
8) Created Adobe Marketing Material – Adobe Photoshop CS3 Extended for Medical Research
Handout presenting top features of Photoshop CS3 for Biomedical Research
9) Magazine Article – New Analysis Tools
Photoshop User - June 2007 Photoshop CS3 Supplement, pp044-046.
10) Magazine Article – Photoshop CS3 Extended Tools Will Help Save Lives Photoshop User – September 2007, pp074-075
11) Poster – MMP-Activated Pro-Drugs for Imaging Vulnerable Atherosclerotic Plaque. Identification of High Activity MMP Substrates and a Potential Metabolic Trapping Mechanism
Poster Coauthor at Joint Molecular Imaging Conference, Providence, Rhode Island, 2007
MMP-Activated Pro-Drugs for Imaging Vulnerable Atherosclerotic Plaque. Identification of High Activity MMP Substrates and a Potential Metabolic Trapping Mechanism
Category: Imaging in Cardiovascular Disease
Presentation Time: Thursday, 6:30 p.m. - 7:30 p.m.
Thomas Harris, Richard Cesati, Carol Hu, Gregory Dwyer, Reinaldo Jones, Michael Azure, Roushan Afroze, Fran Su, Padmaja Yalamanchili, David Onthank, Eric Wexler, Debra Sousa, Mania Kavosi, Megan Hayes, Paula Silva, David Casebier, Simon Robinson, Scott Edwards, Jeremy Kintigh, Anila Desai, Bristol-Myers Squibb Medical Imaging, Billerica, USA. Contact e-mail: thomas.d.harris@bms.com
Presentation Number: 424
Poster Board Number: 230
Coronary plaque rupture is responsible for the majority of fatal acute myocardial infarctions. Current, noninvasive imaging techniques that assess luminal narrowing or calcium content of plaque are poor predictors of plaque vulnerability. Matrix metalloproteinases (MMPs) are upregulated in vulnerable atherosclerotic plaque and recent studies suggest a correlation between the levels of MMPs and plaque vulnerability (J. Clinical Investigation 1994, 94, 2493-503; Circulation 1999, 99, 2503-9; Circulation 2001, 104, 1899-1904). While radiolabeled MMP inhibitors have been evaluated as plaque imaging agents in preclinical models (Circulation, 2004, 109, 107-112), our own results suggest that MMP levels in plaque deposits from human coronary arteries are too low to provide reliable data using radiolabeled MMP inhibitors.
We present here the initial results of our efforts to develop MMP-activated pro-drugs for the imaging of tissues having elevated levels of MMPs. The pro-drugs consist of MMP substrate peptides, a reporter group, and an immobilizing moiety (hydrazide) designed to react with oxidized lipoproteins found in vulnerable plaque. We have identified a number of substrate-reporter conjugates that have high blood stability, low protein binding, and are cleaved efficiently by MMP-2 and MMP-9 (Kcat/Km = 100,000 to 500,000 M-1s-1). Additional digestion by aminopeptidase N generates the hydrazide. Ex vivo studies have shown that 60% of MMP substrate RP806 is cleaved after incubation with rabbit plaque for 15 min at 37 °C. MMP inhibitors block the degradation and uptake of RP806 in rabbit plaque. Bestatin, an inhibitor of aminopeptidase N, also inhibits the binding of RP806 to rabbit plaque. Additionally, in vivo experiments in ApoE mice display preferential uptake of these conjugates in atherosclerotic plaque. This enzymatic amplification of signal has the potential to detect lower levels of MMPs than radiolabeled MMP inhibitors. Details of the synthesis and biological study of these agents will be presented.
12) Magazine Article – Measuring Using More than Just Pixels
Photoshop User – October/November 2007, pp086-087
13) Research Paper – - Mechanism of uptake and retention of 18F BMS-747158-02 in cardiomyocytes: A novel PET myocardial imaging agent
Padmaja Yalamanchili, PhD; Eric Wexler, MBA; Megan Hayes, MS; Ming Yu, MD, PhD; Jody Bozek, BS; Mikhail Kagan, BS; Heike S. Radeke, PhD; Michael Azure, PhD; Ajay Purohit, PhD; David S. Casebier, PhD; Simon P. Robinson, PhD , Journal of Nuclear Cardiology ,Volume 14, Number 6: 782-8 November/December 2007
Abstract
Background: BMS-747158-02, is a novel 18F labeled pyridazinone derivative designed for cardiac imaging. The uptake and retention mechanism of 18F BMS-747158-02 in cardiac myocytes was studied in vitro and the biodistribution of 18F BMS-747158-02 was studied in vivo in mice.
Methods and results: 19F BMS-747158-01 inhibited mitochondrial complex I (MC-1) in bovine heart sub-mitochondrial particles with an IC50 of 16.6±3 nM that was comparable to the reference inhibitors of MC-1, rotenone, pyridaben and deguelin (IC50 = 18.2±6.7 nM, 19.8±2.6 nM and 23.1±1.5 nM respectively). 18F BMS-747158-02 had high uptake in monolayers of neonatal rat cardiomyocytes (10.3±0.7 % of incubated drug at 60 minutes) that was inhibited by 200 nM of rotenone (91±2%) and deguelin (89±3%). In contrast an inactive pyridaben analog P 070 (IC50 value of >4 µM in the MC-1 assay) did not inhibit the binding of 18F BMS-747158-02 in cardiomyocytes. Uptake and washout kinetics for 18F BMS-747158-02 in rat cardiomyocytes indicated that the time to half maximal (t½) uptake was very rapid (approximately 35 seconds) and washout t1/2 for efflux of 18F BMS-747158-02 was >120 minutes. In vivo biodistribution studies in mice showed that 18F BMS-747158-02 had sustained myocardial uptake for 60 minutes and the heart to lung and heart to liver ratios were 14.1±2.5 and 8.3±0.5 at 60 minutes.
Conclusion: 18F BMS-747158-02 is a novel PET cardiac tracer targeting the mitochondrial complex I in cardiomyocytes with rapid uptake and slow washout. These characteristics allow fast and sustained accumulation in the heart.
14) Magazine Article – A Healthy File Format – Photoshop CS3 Extended Supports DICOM
Photoshop User - January/February 2008 pp82-83
15) White Paper - Optimum Strategies for Using Adobe Photoshop CS3 Extended in Biomedical Imaging – Written for Peachpit on behalf of Adobe
16) Contributor to Presentation – SNAP 2007 Meeting - BMS753951: A Novel Low Molecular Weight Magnetic Resonance Contrast Agent Selective For Arterial Wall Imaging
David Onthank, Padmaja Yalamanchili, Richard Cesati, Joel Lazewatsky, Michael Azure, Megan Hayes, Mania Kavosi, Kelly Spencer, Debby Sousa, Eric Wexler, Melanie Lamoy, Thomas Harris, Carol Hu, Reinaldo Jones, Greg Dwyer, David Casebier, Simon Robinson, BMS Medical Imaging, North Billerica,
17) Training Titles for Lynda.com, Dec 2007, currently undergoing editing
1) Using Photoshop CS3 Extended in Biomedical Research (Working title)
2) Photoshop CS3 Extended Biomedical Workflow Examples (Working title)
Will be accessible online at Lynda.com first quarter 2008, possibly on DVD afterwards
In Progress
18) Website – www.ericwexler.com
19) Blog – ericwexler.blogspot.com
20) Book – Use of Photoshop in Biological Research
21) In person workshops – Photoshop for Biological Research – Starts 2008
Just to name few are:
Dr. Joseph Bailey for DICOM training, moral support, and a great friendship.
Pamela Pfiffner for the patience, direction and training materials.
Dr. Simon Robinson for honest feedback, supervision and continued support.
Chris Mattia for the help and direction in the taping of my Lynda.com titles.
Folks at Adobe for the chance give input and training to others on the use of Photoshop by Biomedical Professionals
NAPP staff for the support and training as well as the opportunity to conduct training at Photoshop World and in Photoshop User magazine.
My wonderful wife whose support, proofing, and editing of my work has improved the quality of my material and has made it possible to start doing training and consulting.
2007 Accomplishments
1) Member of Adobe’s Biomedical Image Advisory Group
September 2006 - Present
http://wwwimages.adobe.com/www.adobe.com/products/photoshop/photoshopextended/medical/pdfs
2) eSeminar for Adobe – August 14, 2007
Currently available on Adobe’s onDemand webpage – Photoshop CS3 Extended for Scientific_08_14
Photoshop CS3 Extended for Science and Medical Imaging
Tuesday, August 14th, 2007 9:00 A.M. PDT. 12:00 P.M. EDT
In this seminar, we will demonstrate new selection, measurement, and analysis tools that let you quickly extract and export a wide array of quantitative data from microscopic and radiological images, including native support for DICOM images.
3) Adobe Success Story - Seeing inside
Download at http://wwwimages.adobe.com/www.adobe.com/products/photoshop/photoshopextended/science/pdfs/ericwexler_fnl_04242007.pdf
4) Photoshop Testimonial Video
View at
http://www.adobe.com/products/photoshop/photoshopextended/medical/
5) White Paper - Photoshop: The Standard for Physicians and Biomedical Imaging Professionals
Download at
http://wwwimages.adobe.com/www.adobe.com/products/photoshop/photoshopextended/medical/pdfs/ps_biomed_wp.pdf
6) Photoshop World Boston – Birds of a Feather - Use of Photoshop Extended in Science and Medicine, April 4, 2007
Birds of a Feather Meeting – Medical & Scientific Research Professionals April 4, 5:00 – 7:00 pm Hosted by Adobe – Open to Conference Attendees and Medical Professionals and Research Professionals Attend this session to see the newest features in Photoshop CS3 and Photoshop CS3 Extended developed specifically for customers who use Photoshop for image analysis, visualization and communication. You'll get to meet the team from Adobe that is charged with developing new features for the medical and research communities and hear from some leading customers in the field and how they use Photoshop in their work. Attendees will be eligible to win Photoshop CS3 plus other great prizes. Special Guests: Stephen R. Snow, DDS - with Snow Dental Care & Cosmetic Dentistry; Eric Wexler, MBA - Research Scientist with Bristol-Myers Squibb Medical Imaging; Joseph M. Bailey, MD - Montgomery Radiology Associates; and Robert Hurt – Visualization Scientist – Spitzer Science Center.
Track: Special Event — Room: 207 in the Convention Center
7) Photoshop World Las Vegas Workshop –
a)Contributed Workbook Chapter - Using Photoshop Extended in Science & Research
b)Conducted Workshop -Using Photoshop Extended in Science & Research
with Eric Wexler 10:45a-11:45a September 6, 2007
Eric will demonstrate the uses of Photoshop Extended in the areas of Biology/Microscopy. He will get into the details on measurement, image analysis, as well as image correction/enhancement for presentations and publications. Additionally, Eric will go over the do's and don'ts of image manipulation for medicine: Instructor: Eric Wexler Track: Photoshop® CS3 Extended - Special Interest Track
8) Created Adobe Marketing Material – Adobe Photoshop CS3 Extended for Medical Research
Handout presenting top features of Photoshop CS3 for Biomedical Research
9) Magazine Article – New Analysis Tools
Photoshop User - June 2007 Photoshop CS3 Supplement, pp044-046.
10) Magazine Article – Photoshop CS3 Extended Tools Will Help Save Lives Photoshop User – September 2007, pp074-075
11) Poster – MMP-Activated Pro-Drugs for Imaging Vulnerable Atherosclerotic Plaque. Identification of High Activity MMP Substrates and a Potential Metabolic Trapping Mechanism
Poster Coauthor at Joint Molecular Imaging Conference, Providence, Rhode Island, 2007
MMP-Activated Pro-Drugs for Imaging Vulnerable Atherosclerotic Plaque. Identification of High Activity MMP Substrates and a Potential Metabolic Trapping Mechanism
Category: Imaging in Cardiovascular Disease
Presentation Time: Thursday, 6:30 p.m. - 7:30 p.m.
Thomas Harris, Richard Cesati, Carol Hu, Gregory Dwyer, Reinaldo Jones, Michael Azure, Roushan Afroze, Fran Su, Padmaja Yalamanchili, David Onthank, Eric Wexler, Debra Sousa, Mania Kavosi, Megan Hayes, Paula Silva, David Casebier, Simon Robinson, Scott Edwards, Jeremy Kintigh, Anila Desai, Bristol-Myers Squibb Medical Imaging, Billerica, USA. Contact e-mail: thomas.d.harris@bms.com
Presentation Number: 424
Poster Board Number: 230
Coronary plaque rupture is responsible for the majority of fatal acute myocardial infarctions. Current, noninvasive imaging techniques that assess luminal narrowing or calcium content of plaque are poor predictors of plaque vulnerability. Matrix metalloproteinases (MMPs) are upregulated in vulnerable atherosclerotic plaque and recent studies suggest a correlation between the levels of MMPs and plaque vulnerability (J. Clinical Investigation 1994, 94, 2493-503; Circulation 1999, 99, 2503-9; Circulation 2001, 104, 1899-1904). While radiolabeled MMP inhibitors have been evaluated as plaque imaging agents in preclinical models (Circulation, 2004, 109, 107-112), our own results suggest that MMP levels in plaque deposits from human coronary arteries are too low to provide reliable data using radiolabeled MMP inhibitors.
We present here the initial results of our efforts to develop MMP-activated pro-drugs for the imaging of tissues having elevated levels of MMPs. The pro-drugs consist of MMP substrate peptides, a reporter group, and an immobilizing moiety (hydrazide) designed to react with oxidized lipoproteins found in vulnerable plaque. We have identified a number of substrate-reporter conjugates that have high blood stability, low protein binding, and are cleaved efficiently by MMP-2 and MMP-9 (Kcat/Km = 100,000 to 500,000 M-1s-1). Additional digestion by aminopeptidase N generates the hydrazide. Ex vivo studies have shown that 60% of MMP substrate RP806 is cleaved after incubation with rabbit plaque for 15 min at 37 °C. MMP inhibitors block the degradation and uptake of RP806 in rabbit plaque. Bestatin, an inhibitor of aminopeptidase N, also inhibits the binding of RP806 to rabbit plaque. Additionally, in vivo experiments in ApoE mice display preferential uptake of these conjugates in atherosclerotic plaque. This enzymatic amplification of signal has the potential to detect lower levels of MMPs than radiolabeled MMP inhibitors. Details of the synthesis and biological study of these agents will be presented.
12) Magazine Article – Measuring Using More than Just Pixels
Photoshop User – October/November 2007, pp086-087
13) Research Paper – - Mechanism of uptake and retention of 18F BMS-747158-02 in cardiomyocytes: A novel PET myocardial imaging agent
Padmaja Yalamanchili, PhD; Eric Wexler, MBA; Megan Hayes, MS; Ming Yu, MD, PhD; Jody Bozek, BS; Mikhail Kagan, BS; Heike S. Radeke, PhD; Michael Azure, PhD; Ajay Purohit, PhD; David S. Casebier, PhD; Simon P. Robinson, PhD , Journal of Nuclear Cardiology ,Volume 14, Number 6: 782-8 November/December 2007
Abstract
Background: BMS-747158-02, is a novel 18F labeled pyridazinone derivative designed for cardiac imaging. The uptake and retention mechanism of 18F BMS-747158-02 in cardiac myocytes was studied in vitro and the biodistribution of 18F BMS-747158-02 was studied in vivo in mice.
Methods and results: 19F BMS-747158-01 inhibited mitochondrial complex I (MC-1) in bovine heart sub-mitochondrial particles with an IC50 of 16.6±3 nM that was comparable to the reference inhibitors of MC-1, rotenone, pyridaben and deguelin (IC50 = 18.2±6.7 nM, 19.8±2.6 nM and 23.1±1.5 nM respectively). 18F BMS-747158-02 had high uptake in monolayers of neonatal rat cardiomyocytes (10.3±0.7 % of incubated drug at 60 minutes) that was inhibited by 200 nM of rotenone (91±2%) and deguelin (89±3%). In contrast an inactive pyridaben analog P 070 (IC50 value of >4 µM in the MC-1 assay) did not inhibit the binding of 18F BMS-747158-02 in cardiomyocytes. Uptake and washout kinetics for 18F BMS-747158-02 in rat cardiomyocytes indicated that the time to half maximal (t½) uptake was very rapid (approximately 35 seconds) and washout t1/2 for efflux of 18F BMS-747158-02 was >120 minutes. In vivo biodistribution studies in mice showed that 18F BMS-747158-02 had sustained myocardial uptake for 60 minutes and the heart to lung and heart to liver ratios were 14.1±2.5 and 8.3±0.5 at 60 minutes.
Conclusion: 18F BMS-747158-02 is a novel PET cardiac tracer targeting the mitochondrial complex I in cardiomyocytes with rapid uptake and slow washout. These characteristics allow fast and sustained accumulation in the heart.
14) Magazine Article – A Healthy File Format – Photoshop CS3 Extended Supports DICOM
Photoshop User - January/February 2008 pp82-83
15) White Paper - Optimum Strategies for Using Adobe Photoshop CS3 Extended in Biomedical Imaging – Written for Peachpit on behalf of Adobe
16) Contributor to Presentation – SNAP 2007 Meeting - BMS753951: A Novel Low Molecular Weight Magnetic Resonance Contrast Agent Selective For Arterial Wall Imaging
David Onthank, Padmaja Yalamanchili, Richard Cesati, Joel Lazewatsky, Michael Azure, Megan Hayes, Mania Kavosi, Kelly Spencer, Debby Sousa, Eric Wexler, Melanie Lamoy, Thomas Harris, Carol Hu, Reinaldo Jones, Greg Dwyer, David Casebier, Simon Robinson, BMS Medical Imaging, North Billerica,
17) Training Titles for Lynda.com, Dec 2007, currently undergoing editing
1) Using Photoshop CS3 Extended in Biomedical Research (Working title)
2) Photoshop CS3 Extended Biomedical Workflow Examples (Working title)
Will be accessible online at Lynda.com first quarter 2008, possibly on DVD afterwards
In Progress
18) Website – www.ericwexler.com
19) Blog – ericwexler.blogspot.com
20) Book – Use of Photoshop in Biological Research
21) In person workshops – Photoshop for Biological Research – Starts 2008
Wednesday, November 28, 2007
Drobo - The answer to our storage needs?
Drobo may be the next big thing in file storage.
As a research scientist I have seen my data storage requirements grow and I have been constantly looking for a product that can grow with my needs.
Most recently I have relied on large single disk hard drives as my main storage but with the introduction of data robotics Drobo I am considering that as a viable replacement to my stack of 500GB Lacie drives.
I am not one with enough experience or patience to set up a server or raid device. So when I saw the Data Robotics booth at Photoshop World Boston in 2007 I thought this may be an answer to my prayers directed at the data storage gods.
I was intrigued by three factors. The first is the ability to protect data on the fly using multiple drives in a single piece of hardware without raid configuration. The second is the expansion capability to add drives so the system can grow as hard drive prices decreases and storage needs increase. And third the relative low cost of a unit, inexpensive enough for easy acquisition for lab and personal use.
After multiple encounters with Data Robotics booth staff and explaining to them about the unique needs of Biomedical professionals they sent me an evaluation unit to test out.
I received it about two weeks ago and have used it intensely over that time in the storage of images and other media files as well as backing up my primary production system, an Intel Mac Book Pro.

Once the box from Data Robotics’ arrived. The unpacking went as expected and I was ready to add SATA hard drives to the unit.
The cover is held in place with a magnetic latch and can easily be removed. Adding the drives was the easiest installation I have seen. The drives slide in ands snap into unseen receptacles fitting power and cables automatically. There are four open drive bays that accept full and half height drives.

I won’t bore you with all the details. The rest of the set up went smoothly following the included instructions. I installed the Drobo Dashboard to initialize the Drobo and gain control over options. The Dashboard allows visualization of the status of the unit beyond the informative lights on the front of the Drobo.
The most important factors of any storage device is the ability to hold precious data, “my precious, precious.’
In this regard the Drobo is doing wonderfully. Currently I have approx 650GB of usable data storage with three drives 750, 400, and 320GB. This unbalanced drive size has left 320GB of space reserved for expansion. The kind way to telling that there is some usable space. Using the Drobolator, at www.drobo.com/drobolator, it is easy to configure and optimize drive sizes for the maximum amount of protected storage

Using the Drobolator I determined that to expand my storage capacity my best next drive purchase should be a 750GB drive (currently ~$180).

My next step will be putting the Drobo through its paces, developing workflows to use the increased storage capacity and confidence in its data protection abilities.
So far it seems to fulfill my in data storage needs. Now lets see how it adds value to my work.
Pros:
1) Provides data protection without the need of Raid configuration
2) Can use SATA drives already on hand
3) Can add additional drives at any time
4) Simple to set up and use
5) I’m am better able to sleep
Improvement Considerations:
1) Correct storage space reported on the Macintosh (Info displays 2TB with Mac operation system)
2) Higher speed transfer (The current Drobo uses USB 2.0 port, why not add additional options)
3) On/off switch ( The unit powers down when the computer is turned off but sometimes I may just want to have the unit off without unplugging the power
Data Robotics Drobo Storage Robot Multiple 4-Drive Enclosure ~ $480 online
As a research scientist I have seen my data storage requirements grow and I have been constantly looking for a product that can grow with my needs.
Most recently I have relied on large single disk hard drives as my main storage but with the introduction of data robotics Drobo I am considering that as a viable replacement to my stack of 500GB Lacie drives.
I am not one with enough experience or patience to set up a server or raid device. So when I saw the Data Robotics booth at Photoshop World Boston in 2007 I thought this may be an answer to my prayers directed at the data storage gods.
I was intrigued by three factors. The first is the ability to protect data on the fly using multiple drives in a single piece of hardware without raid configuration. The second is the expansion capability to add drives so the system can grow as hard drive prices decreases and storage needs increase. And third the relative low cost of a unit, inexpensive enough for easy acquisition for lab and personal use.
After multiple encounters with Data Robotics booth staff and explaining to them about the unique needs of Biomedical professionals they sent me an evaluation unit to test out.
I received it about two weeks ago and have used it intensely over that time in the storage of images and other media files as well as backing up my primary production system, an Intel Mac Book Pro.

This is the current picture of the Drobo in use.
Once the box from Data Robotics’ arrived. The unpacking went as expected and I was ready to add SATA hard drives to the unit.
The cover is held in place with a magnetic latch and can easily be removed. Adding the drives was the easiest installation I have seen. The drives slide in ands snap into unseen receptacles fitting power and cables automatically. There are four open drive bays that accept full and half height drives.

Half height 120GB drive in bottom bay.
I won’t bore you with all the details. The rest of the set up went smoothly following the included instructions. I installed the Drobo Dashboard to initialize the Drobo and gain control over options. The Dashboard allows visualization of the status of the unit beyond the informative lights on the front of the Drobo.
The most important factors of any storage device is the ability to hold precious data, “my precious, precious.’
In this regard the Drobo is doing wonderfully. Currently I have approx 650GB of usable data storage with three drives 750, 400, and 320GB. This unbalanced drive size has left 320GB of space reserved for expansion. The kind way to telling that there is some usable space. Using the Drobolator, at www.drobo.com/drobolator, it is easy to configure and optimize drive sizes for the maximum amount of protected storage

Current drive set up in the Drobo and the overall memory situation.
Using the Drobolator I determined that to expand my storage capacity my best next drive purchase should be a 750GB drive (currently ~$180).

Drobolator with optimized hard drive configuration.
My next step will be putting the Drobo through its paces, developing workflows to use the increased storage capacity and confidence in its data protection abilities.
So far it seems to fulfill my in data storage needs. Now lets see how it adds value to my work.
Pros:
1) Provides data protection without the need of Raid configuration
2) Can use SATA drives already on hand
3) Can add additional drives at any time
4) Simple to set up and use
5) I’m am better able to sleep
Improvement Considerations:
1) Correct storage space reported on the Macintosh (Info displays 2TB with Mac operation system)
2) Higher speed transfer (The current Drobo uses USB 2.0 port, why not add additional options)
3) On/off switch ( The unit powers down when the computer is turned off but sometimes I may just want to have the unit off without unplugging the power
Data Robotics Drobo Storage Robot Multiple 4-Drive Enclosure ~ $480 online
Tuesday, October 30, 2007
Oct 30 - DICOM Workflow Presentation
I have just finished watching the eSeminar titled DICOM workflow for publishing with CS3 Extended.
It seems that one of the slides is a holdover from my eSeminar I gave for Adobe to cover Photoshop CS3 Extended's use as a scientific researcher.
I have been preparing in depth training for lynda.com as well as a book for using Photoshop in biomedical research.
To learn more you can read my articles in the past few issues of Photoshop user.
If I can be of help please contact me at ericjwexlerATyahoo.com.
It seems that one of the slides is a holdover from my eSeminar I gave for Adobe to cover Photoshop CS3 Extended's use as a scientific researcher.
I have been preparing in depth training for lynda.com as well as a book for using Photoshop in biomedical research.
To learn more you can read my articles in the past few issues of Photoshop user.
If I can be of help please contact me at ericjwexlerATyahoo.com.
Thursday, August 9, 2007
The other side
As of May 9th 2007 I am in the world of the W9's. Opportunities and need crossed paths where I stood and led me in somewhat different direction. With my involvement on Adobe's Biomedical Image Advisory Group I saw the need of training other scientists in the use of Photoshop for communication and research.
Many perceive Photoshop as a difficult program and the multitudes are intimidated not only by its complexity but by imaging in general. Someday there will be a fourth R taught in school. Along with reading, writing, and rithmatic should be really good imaging.
How many of us are fearful of a word processor. Working with language is as complex as working with images. The power of words can match the power of images. Verbal communication can be eloquent and beautiful or fragmented and disturbing. But many years of training and effort gives us comfort to concentrate more on the content of our words than the controls in the software aiding us in the act of communication. If everyone had as much training in working with visual arts and technology Photoshop would seem less imposing.
All that being said, our society increasingly relies on the visual presentation of information. To take the time to learn and apply imaging resources is an endeavor that will be rewarded by communication your intended message efficiently and effectively.
Many perceive Photoshop as a difficult program and the multitudes are intimidated not only by its complexity but by imaging in general. Someday there will be a fourth R taught in school. Along with reading, writing, and rithmatic should be really good imaging.
How many of us are fearful of a word processor. Working with language is as complex as working with images. The power of words can match the power of images. Verbal communication can be eloquent and beautiful or fragmented and disturbing. But many years of training and effort gives us comfort to concentrate more on the content of our words than the controls in the software aiding us in the act of communication. If everyone had as much training in working with visual arts and technology Photoshop would seem less imposing.
All that being said, our society increasingly relies on the visual presentation of information. To take the time to learn and apply imaging resources is an endeavor that will be rewarded by communication your intended message efficiently and effectively.
Thursday, August 2, 2007
Then a leap
All good things
From 1995 to 2001 I conducted my own experiments and supported the other researchers at DuPont Pharmaceuticals. In 2001 Bristol Myers Squibb purchased the company and in the span of one year closed down the research site I worked at.
My wife and I relocated to the Boston area where she was offered a nice research position. I relocated and was rehired by Bristol-Myers Squibb at the Medical Imaging site in Billerica, MA.
There I was able to reacquire a majority of the equipment I used at the DuPont site. I then set up a histology lab and a shadow of my digital darkroom.
Over the next 4 years I researched vulnerable plaque, PET perfusion imaging agent, and a variety of other imaging agents, mainly cardiovascular. I applied my knowledge and expanded into new technical areas like autoradiography, cellular kinetics, and special histology stains. All the histology efforts on the site were conducted by myself and my part time intern, Be Luu. Her attention to detail and concentration on the tasks at hand produced samples demonstrating morphology in cryosections better than what I have seen in paraffin sections produced by contract labs.
Again I conducted my own research and supported both discovery and development with my microscopy and imaging skills. Under my supervisor - Padmaja Yalamanchili I was given the opportunity to learn and grow not only in my imaging and histology skills but also in cell biology, tissue based assays, and radioligand based research.
The discovery biology group was small (< 20) and everyone needed to be able to conduct a wide variety of work. The Discovery Biology group put together and managed by Simon Robinson was a dedicated and talented group of people doing extraordinary work in both scientifically and productively with very limited resources. I was proud to be part of that team.
From 1995 to 2001 I conducted my own experiments and supported the other researchers at DuPont Pharmaceuticals. In 2001 Bristol Myers Squibb purchased the company and in the span of one year closed down the research site I worked at.
My wife and I relocated to the Boston area where she was offered a nice research position. I relocated and was rehired by Bristol-Myers Squibb at the Medical Imaging site in Billerica, MA.
There I was able to reacquire a majority of the equipment I used at the DuPont site. I then set up a histology lab and a shadow of my digital darkroom.
Over the next 4 years I researched vulnerable plaque, PET perfusion imaging agent, and a variety of other imaging agents, mainly cardiovascular. I applied my knowledge and expanded into new technical areas like autoradiography, cellular kinetics, and special histology stains. All the histology efforts on the site were conducted by myself and my part time intern, Be Luu. Her attention to detail and concentration on the tasks at hand produced samples demonstrating morphology in cryosections better than what I have seen in paraffin sections produced by contract labs.
Again I conducted my own research and supported both discovery and development with my microscopy and imaging skills. Under my supervisor - Padmaja Yalamanchili I was given the opportunity to learn and grow not only in my imaging and histology skills but also in cell biology, tissue based assays, and radioligand based research.
The discovery biology group was small (< 20) and everyone needed to be able to conduct a wide variety of work. The Discovery Biology group put together and managed by Simon Robinson was a dedicated and talented group of people doing extraordinary work in both scientifically and productively with very limited resources. I was proud to be part of that team.
Yet another step
Photoshop works well with others
During the late 90's two of my main projects combined imaging abilities with scientific and technical skills.
The evaluation of cell cycle inhibitors for the oncology group relying on the evaluation of tumors from the xenograft model. With the digital darkroom established multitudes of tumor sections were analyzed by me in my lab. My lab partners handled the in vivo portion of the experiments which took quite a but of there efforts. I would be present at the take down and collect and gross the tumors. Then the sections (no thicker than a nickel to allow for proper fixation) were processed onto paraffin blocks. The samples were sectioned at 5 microns and stained with hematoxylin & eosin for morphological examination. For the analysis of the triad of tumor growth - Proliferation, Angiogenesis, and Apoptosis. Sections were stained using immunohistochemistry of BrdU and Factor VIII , and the Apotag in situ kit.
The image acquisition and analysis of MCID M2 system worked well with the image compositions and output features of Photoshop. I was able to effectively and efficiently communicate my findings by creating composites of the different stained images of the serial sections of the tumors.
The details can be found in these two papers -
Novel small molecule alpha v integrin antagonists: comparative anti-cancer efficacy with known angiogenesis inhibitors.
Anticancer Res. 1999 Mar-Apr;19(2A):959-68.
Tumor biology: use of tiled images in conjunction with measurements of cellular proliferation and death in response to drug treatments.
Clin Cancer Res. 2000 Aug;6(8):3361-70.
The other project was to determine a compound potential for prevented infarct damage due to a stroke. In this case I developed and validated the images analysis methodology and gave feedback to those conducting the in vivo portion of the work. Here, Image Pro Plus 4.1 from Media Cybernetics was invaluable for successfully completing the research. I was able to determine a more objective method to measure the infarcted ares of the brain sections. Later I published my work and presented it in front of a neurobiology section at Experimental Biology in Orlando, 2000.
My publication, An objective procedure for ischemic area evaluation of the stroke intraluminal thread model in the mouse and rat. J Neurosci Methods. 2002 Jan 15;113(1):51-8, was published after I was laid off (details next entry).
So, I didn't have access to my own article unless I paid $30 to the publisher. I sure I will rant about the situation in scientific publishing later.
With Photoshop CS3 Extended I could conduct the same image processing and analysis that I did with Image Pro Plus. I hope to share that full workflow when I have it down on paper.
During the late 90's two of my main projects combined imaging abilities with scientific and technical skills.
The evaluation of cell cycle inhibitors for the oncology group relying on the evaluation of tumors from the xenograft model. With the digital darkroom established multitudes of tumor sections were analyzed by me in my lab. My lab partners handled the in vivo portion of the experiments which took quite a but of there efforts. I would be present at the take down and collect and gross the tumors. Then the sections (no thicker than a nickel to allow for proper fixation) were processed onto paraffin blocks. The samples were sectioned at 5 microns and stained with hematoxylin & eosin for morphological examination. For the analysis of the triad of tumor growth - Proliferation, Angiogenesis, and Apoptosis. Sections were stained using immunohistochemistry of BrdU and Factor VIII , and the Apotag in situ kit.
The image acquisition and analysis of MCID M2 system worked well with the image compositions and output features of Photoshop. I was able to effectively and efficiently communicate my findings by creating composites of the different stained images of the serial sections of the tumors.
The details can be found in these two papers -
Novel small molecule alpha v integrin antagonists: comparative anti-cancer efficacy with known angiogenesis inhibitors.
Anticancer Res. 1999 Mar-Apr;19(2A):959-68.
Tumor biology: use of tiled images in conjunction with measurements of cellular proliferation and death in response to drug treatments.
Clin Cancer Res. 2000 Aug;6(8):3361-70.
The other project was to determine a compound potential for prevented infarct damage due to a stroke. In this case I developed and validated the images analysis methodology and gave feedback to those conducting the in vivo portion of the work. Here, Image Pro Plus 4.1 from Media Cybernetics was invaluable for successfully completing the research. I was able to determine a more objective method to measure the infarcted ares of the brain sections. Later I published my work and presented it in front of a neurobiology section at Experimental Biology in Orlando, 2000.
My publication, An objective procedure for ischemic area evaluation of the stroke intraluminal thread model in the mouse and rat. J Neurosci Methods. 2002 Jan 15;113(1):51-8, was published after I was laid off (details next entry).
So, I didn't have access to my own article unless I paid $30 to the publisher. I sure I will rant about the situation in scientific publishing later.
With Photoshop CS3 Extended I could conduct the same image processing and analysis that I did with Image Pro Plus. I hope to share that full workflow when I have it down on paper.
Wednesday, August 1, 2007
One more step
Imaging Support Grows with Opportunities
I feel I must continue to bring readers up to speed on my development of imaging skills. Mainly to encourage those who have an opportunity to see an unfilled niche and develop the resources to fill it. At this point in the mid 90's I was getting my M.B.A. and everything could be summed up in two words "create value."
My development of the Digital Darkroom capabilities expanded with brining in a flatbed scanner to digitize pictures previously made and the acquisition of additional imaging software, Adobe Photoshop Version 4 and Image Pro Plus from Media Cybernetics. The integration of image acquisition, processing, analysis, and output provided a complete package to aid myself and other scientists to conduct research.
As part of the general pharmacology group led by Andrew Slee and my immediate supervisor Janet Kerr I provided services to the different therapeutic groups of Dupont Merck. Two groups I concentrated on helping were oncology and cardiovascular disease. But over time I worked expanded to helping those working on inflammation, CNS, and anti-microbial therapies.
Creating Calibration Standards using Photoshop CS3 Extended
Creating calibrations to match the number of pixels with a know distance is easy with Photoshop CS3 Extended. A image that is parallel to the image sensor plane with a known distance is best to use. Most of my work concerns scanned materials or images from a microscope.
Open the image with the known distance
Pull down the Analysis Menu and select Set measurement scale > custom
This opens the measurement scale dialog window.
Move your cursor to the image. Photoshop has kindly and automatically given you the ruler tool.
Place one end on a edge of your known distance then move the other edge of the ruler tool to the other end of the known distance. Make sure that the point is located in the same way. If your first point is on the left side of a black line then the ending point should also be on the left side. To constrain the tool to 45 degree increments hold down the shift key.
With the ruler distance matching the known distance Photoshop reports the number of pixels in the length.
Fill in the actual known distance in the logical length field. If you know that the length you drew was 4 centimeters fill in the number 4.
Logical units is to set the name of the units of measurement. In this field enter in centimeter or an abbreviation like cm.
Finally save the calibration file you just made by clicking on the save preset button and giving a name to your calibration.
This calibration in now accessible under the set measurement scale call out to be applied on any other image you open in Photoshop.

Click image for better view.
I feel I must continue to bring readers up to speed on my development of imaging skills. Mainly to encourage those who have an opportunity to see an unfilled niche and develop the resources to fill it. At this point in the mid 90's I was getting my M.B.A. and everything could be summed up in two words "create value."
My development of the Digital Darkroom capabilities expanded with brining in a flatbed scanner to digitize pictures previously made and the acquisition of additional imaging software, Adobe Photoshop Version 4 and Image Pro Plus from Media Cybernetics. The integration of image acquisition, processing, analysis, and output provided a complete package to aid myself and other scientists to conduct research.
As part of the general pharmacology group led by Andrew Slee and my immediate supervisor Janet Kerr I provided services to the different therapeutic groups of Dupont Merck. Two groups I concentrated on helping were oncology and cardiovascular disease. But over time I worked expanded to helping those working on inflammation, CNS, and anti-microbial therapies.
Creating Calibration Standards using Photoshop CS3 Extended
Creating calibrations to match the number of pixels with a know distance is easy with Photoshop CS3 Extended. A image that is parallel to the image sensor plane with a known distance is best to use. Most of my work concerns scanned materials or images from a microscope.
Open the image with the known distance
Pull down the Analysis Menu and select Set measurement scale > custom
This opens the measurement scale dialog window.
Move your cursor to the image. Photoshop has kindly and automatically given you the ruler tool.
Place one end on a edge of your known distance then move the other edge of the ruler tool to the other end of the known distance. Make sure that the point is located in the same way. If your first point is on the left side of a black line then the ending point should also be on the left side. To constrain the tool to 45 degree increments hold down the shift key.
With the ruler distance matching the known distance Photoshop reports the number of pixels in the length.
Fill in the actual known distance in the logical length field. If you know that the length you drew was 4 centimeters fill in the number 4.
Logical units is to set the name of the units of measurement. In this field enter in centimeter or an abbreviation like cm.
Finally save the calibration file you just made by clicking on the save preset button and giving a name to your calibration.
This calibration in now accessible under the set measurement scale call out to be applied on any other image you open in Photoshop.

Click image for better view.
Tuesday, July 31, 2007
The step after
Development of my Imaging Capabilities
Once the new imaging system was set up I started to develop my knowledge of digital imaging for science. I was surrounded by Phd's and peers with the need to incorporate imaging and image analysis techniques into their research.
The beginning of the digital dark room support at DuPont Merck Pharmaceuticals was an off shoot of my microscopy and histology skills. In order for me to convey what I saw through the scope I had relied on 35mm camera backs and the training I had at ATCC microscopy course taught by Mortimor Abramowitz.
The cost, time, and effort of film based images was the price my company had to pay until I went digital. The payback was immediate and rewarding. The epifluorescence work I was in the middle of conducting went from a turn around time of days and then sometime having to redo an entire experiment to being able to precisely visualize the optimum exposure and focus.


With turnaround time becoming instantaneous and the new ability to work with images directly on a monitor possibilities of using this resource to advance our pharmaceutical research grew.
Photoshop CS3 Extended
The new analysis menu item is only accessible if your have the Extended version of Photoshop CS3. Under this menu one can find calibration, data point selection, basic analysis tools, and the ability to automatically place a calibrated scale bar annotation in an image. Associated with the eyedropper tool are two analysis tools, the ruler tool and a new count tool.
Many researchers use Photoshop to optimize images for communication. Some, including myself, will incorporate Photoshop in their workflow to process images prior to analysis in dedicated image analysis software. My favorite is Image Pro Plus from Media Cybernetics. Now Photoshop analysis abilities will not supplant a dedicated program it can, for simpler analysis, process the entire workflow.
Once the new imaging system was set up I started to develop my knowledge of digital imaging for science. I was surrounded by Phd's and peers with the need to incorporate imaging and image analysis techniques into their research.
The beginning of the digital dark room support at DuPont Merck Pharmaceuticals was an off shoot of my microscopy and histology skills. In order for me to convey what I saw through the scope I had relied on 35mm camera backs and the training I had at ATCC microscopy course taught by Mortimor Abramowitz.
The cost, time, and effort of film based images was the price my company had to pay until I went digital. The payback was immediate and rewarding. The epifluorescence work I was in the middle of conducting went from a turn around time of days and then sometime having to redo an entire experiment to being able to precisely visualize the optimum exposure and focus.


With turnaround time becoming instantaneous and the new ability to work with images directly on a monitor possibilities of using this resource to advance our pharmaceutical research grew.
Photoshop CS3 Extended
The new analysis menu item is only accessible if your have the Extended version of Photoshop CS3. Under this menu one can find calibration, data point selection, basic analysis tools, and the ability to automatically place a calibrated scale bar annotation in an image. Associated with the eyedropper tool are two analysis tools, the ruler tool and a new count tool.
Many researchers use Photoshop to optimize images for communication. Some, including myself, will incorporate Photoshop in their workflow to process images prior to analysis in dedicated image analysis software. My favorite is Image Pro Plus from Media Cybernetics. Now Photoshop analysis abilities will not supplant a dedicated program it can, for simpler analysis, process the entire workflow.
Monday, July 30, 2007
The next step
Let's get to business. I have used Photoshop in one version or another since 1995. Initially it was just to open images, tweak them for presentations or publications, then print them out. At first, my work was never more complex than adding annotations.

During this time I was researching proliferation of cancer cells in the mouse xenograft model. In order to investigate properly I was given the opportunity to build a imaging system. After thorough investigation I decided on a Olympus AX70 with full manual controls coupled to Imaging Research's MCID M2 turnkey system. My acquisition camera was a Sony DXC970 video camera(640x480). The strength of the system was the ability to create tiled images - full field of view of my specimens with high resolution. To properly convey my images Photoshop became a necessary tool to work with these large images. (up to 200mb in 1995)

The need preceded the learning. I started to see Photoshop as more than a communication tool. Its features and abilities would combine to provide additional research potential.
Photoshop CS3 Extended
Photoshop CS3 Extended now supports opening DICOM images without additional plug-ins. There are multiple ways to import images that are saved in this medical image file standard.
There are at least five ways to open DICOM files with PSP CS3 Extended:
1) Open individual images through the DICOM import.
2) Open a selected group of DICOM images via DICOM import.
3) Open the selected group as an image stack by selecting just the first of a set of DICOM images bringing them directly in as an animation.
4) Load multiple DICOM images script under the File>scripts.
5) Convert DICOM into JPEG and then bring them in as JPEG's (losing data information in the lower bit depth and lossy compression.

During this time I was researching proliferation of cancer cells in the mouse xenograft model. In order to investigate properly I was given the opportunity to build a imaging system. After thorough investigation I decided on a Olympus AX70 with full manual controls coupled to Imaging Research's MCID M2 turnkey system. My acquisition camera was a Sony DXC970 video camera(640x480). The strength of the system was the ability to create tiled images - full field of view of my specimens with high resolution. To properly convey my images Photoshop became a necessary tool to work with these large images. (up to 200mb in 1995)

The need preceded the learning. I started to see Photoshop as more than a communication tool. Its features and abilities would combine to provide additional research potential.
Photoshop CS3 Extended
Photoshop CS3 Extended now supports opening DICOM images without additional plug-ins. There are multiple ways to import images that are saved in this medical image file standard.
There are at least five ways to open DICOM files with PSP CS3 Extended:
1) Open individual images through the DICOM import.
2) Open a selected group of DICOM images via DICOM import.
3) Open the selected group as an image stack by selecting just the first of a set of DICOM images bringing them directly in as an animation.
4) Load multiple DICOM images script under the File>scripts.
5) Convert DICOM into JPEG and then bring them in as JPEG's (losing data information in the lower bit depth and lossy compression.
Subscribe to:
Posts (Atom)
